2026-04-27
Content
Switching from fluorescent to LED is one of the most straightforward upgrades you can make to any space — whether indoors or outdoors. The process involves either replacing the entire fixture or using a compatible LED tube in your existing fluorescent housing. Most homeowners and facility managers complete a basic conversion in under 30 minutes per fixture, with no electrician required in many cases.
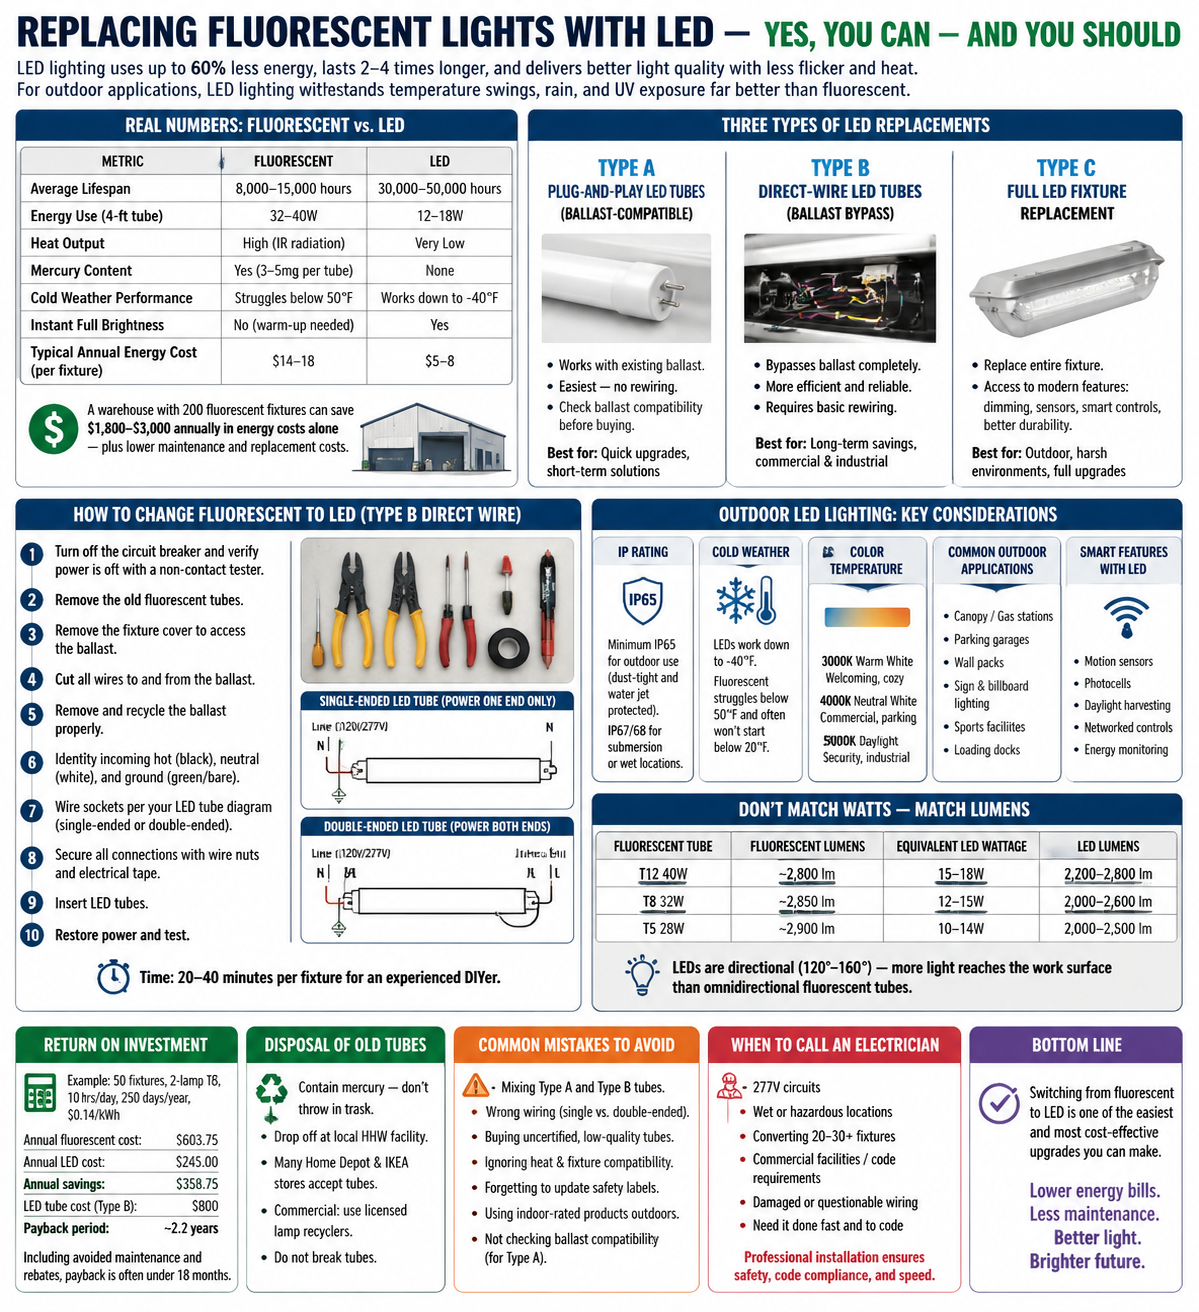
LED lighting uses up to 60% less energy than fluorescent, lasts 2 to 4 times longer, and produces better light quality with less flicker and heat. For outdoor applications, the benefits are even more pronounced — outdoor LED lighting withstands temperature swings, rain, and UV exposure far better than fluorescent alternatives.
This guide walks you through every step of the conversion process, covering indoor and outdoor scenarios, the types of LED replacements available, cost savings, and common mistakes to avoid.
Before diving into the how-to, it helps to understand what's actually at stake. The case for switching is not just theoretical — the energy and maintenance savings are well-documented across residential and commercial settings.
| Metric | Fluorescent | LED |
|---|---|---|
| Average Lifespan | 8,000–15,000 hours | 30,000–50,000 hours |
| Energy Use (4-ft tube) | 32–40W | 12–18W |
| Heat Output | High (IR radiation) | Very Low |
| Mercury Content | Yes (3–5mg per tube) | None |
| Cold Weather Performance | Struggles below 50°F | Works down to -40°F |
| Instant Full Brightness | No (warm-up needed) | Yes |
| Typical Annual Energy Cost (per fixture) | ~$14–18 | ~$5–8 |
A commercial warehouse running 200 fluorescent fixtures can expect to cut its lighting electricity bill by $1,800 to $3,000 annually after converting to LED — and that figure doesn't account for reduced maintenance labor and replacement tube costs.
Not all LED conversions are the same. Before you buy anything, you need to know which approach fits your existing fixtures and budget. There are three main routes.
These LED tubes are designed to work with your existing fluorescent ballast. You simply pull out the old fluorescent tube and insert the new LED one — no rewiring needed. This is the fastest and simplest conversion method.
The catch: ballasts wear out over time, and when they fail, you'll need to either replace the ballast (which adds cost) or switch to a Type B tube. Also, not every LED tube is compatible with every ballast. Always check the manufacturer's compatibility list before purchasing.
This method bypasses the ballast entirely by rewiring the fixture to connect directly to line voltage (120V or 277V). The ballast is either removed or left in place but disconnected. Type B tubes are more energy-efficient than Type A because they eliminate the power losses caused by the ballast.
This is the preferred long-term solution for most commercial and industrial settings. The initial setup requires basic electrical work — turning off the circuit breaker, removing the ballast wiring, and connecting the socket wires directly to the power supply — but once done, you eliminate future ballast replacement costs entirely.
Sometimes the best move is to replace the entire fluorescent housing with a new LED-specific fixture. This is especially relevant for outdoor LED lighting, where you want IP-rated enclosures designed from the ground up for LED drivers rather than retrofitted fluorescent housings that may not provide adequate moisture or impact protection.
Full fixture replacement costs more upfront but gives you access to features like integrated dimming, motion sensors, smart controls, and purpose-built thermal management — all of which extend LED lifespan and maximize energy savings.
The Type B ballast bypass method is the most durable and widely recommended approach. Here's exactly how to do it for a standard 4-foot T8 or T12 fluorescent fixture.
Total time for an experienced DIYer: 20 to 40 minutes per fixture. If you're doing a large batch, the process becomes faster with practice.
Outdoor environments introduce variables that don't exist indoors — moisture, temperature extremes, insects, UV degradation, and physical impact. Outdoor LED lighting must be selected with these factors in mind, and a simple tube swap is rarely enough.
IP (Ingress Protection) ratings tell you how well a fixture resists dust and water. For outdoor LED lighting, you need at minimum IP65, which means the fixture is dust-tight and protected against water jets from any direction. Wet or submerged environments (like fountain lighting or underground installations) require IP67 or IP68.
Fluorescent fixtures designed for outdoor use typically have IP ratings as well, but many older installations use fluorescent lights in covered areas where they're only partially protected. When replacing these, evaluate whether the existing housing provides adequate protection or whether a full fixture replacement is warranted.
One of the most compelling arguments for outdoor LED lighting in cold climates is temperature performance. Fluorescent lamps lose significant lumen output below 50°F (10°C) and often fail to start at all below 20°F (-7°C). This is why fluorescent outdoor lighting in parking garages, cold storage facilities, and northern climates has historically been plagued with slow-start and dim-output problems.
Quality outdoor LED lighting operates reliably down to -40°F (-40°C) with no warm-up time. This is not a minor improvement — it's a fundamental capability difference that makes LED the only practical choice for cold-environment outdoor applications.
Color temperature, measured in Kelvin (K), affects how outdoor spaces look and feel. For outdoor LED lighting, the most common choices are:
Most fluorescent outdoor lights were in the 4100K range. When replacing them, matching or slightly lowering the color temperature (to 4000K) will provide comparable or improved visual clarity while reducing the harsh, sterile quality of older fluorescent installations.
One of the most common mistakes made during fluorescent-to-LED conversions is purchasing an LED replacement based on wattage rather than lumens. Because LEDs are dramatically more efficient, a 15W LED tube can produce the same or greater light output as a 32W fluorescent tube. Matching watts means you end up with a much brighter space than intended — or more likely, you overspend on LEDs you don't need.
Use this general rule of thumb for 4-foot tubes:
| Fluorescent Tube | Fluorescent Lumens | Equivalent LED Wattage | LED Lumens |
|---|---|---|---|
| T12 40W | ~2,800 lm | 15–18W | 2,200–2,800 lm |
| T8 32W | ~2,850 lm | 12–15W | 2,000–2,600 lm |
| T5 28W | ~2,900 lm | 10–14W | 2,000–2,500 lm |
Also keep in mind that LEDs are directional light sources. Fluorescent tubes emit light in all directions (360°), so a portion of their output is wasted bouncing off reflectors or into the ceiling cavity. An LED tube directing light downward at 120° to 160° delivers its lumens more efficiently to the work surface, meaning a lower-lumen LED often provides the same or better illumination on the floor or desk level.
If you've decided to go the Type A plug-and-play route — at least as a first step — ballast compatibility is critical. Not all electronic ballasts work with all LED tubes, and using an incompatible combination can cause flickering, buzzing, premature LED failure, or the tube simply not turning on.
To check compatibility:
Magnetic ballasts — found in older T12 fixtures — are almost never compatible with modern LED tubes and must be bypassed or the fixture must be replaced entirely.
The financial case for switching is strong, but the exact payback period depends on your current electricity rate, daily operating hours, and the number of fixtures involved. Here's how to work it out.
Example scenario: An office with 50 two-lamp fluorescent fixtures, each using two 32W T8 tubes (plus ballast loss of about 5W per fixture), operating 10 hours per day, 250 days per year, at $0.14/kWh.
Factor in avoided ballast replacements (every 7–10 years at $25–60 each) and fluorescent tube replacements (every 2–3 years), and the actual payback period is often under 18 months. Many utility companies also offer rebates for commercial LED upgrades that further reduce upfront costs — sometimes by 30–50%.
Fluorescent tubes contain mercury — a toxic heavy metal — and cannot be thrown in regular trash in most jurisdictions. Each standard 4-foot T8 tube contains approximately 3.5 to 5 milligrams of mercury, which is enough to contaminate a small body of water.
Options for proper disposal include:
One of the underappreciated advantages of switching to LED — particularly for outdoor LED lighting — is access to smart controls that were simply not practical with fluorescent technology. Fluorescent lamps degrade rapidly with frequent switching and don't dim well, making them poorly suited to sensor-driven or networked lighting control systems.
Outdoor LED fixtures with integrated PIR (passive infrared) or microwave motion sensors can dim to 10–20% during unoccupied periods and ramp up instantly when someone enters the area. In parking lots and walkways, this approach typically saves an additional 30–50% on top of the baseline LED energy savings.
Outdoor LED lighting with built-in photocells or DALI/0-10V dimming inputs can respond to ambient light levels, automatically reducing output during dusk/dawn periods or on overcast days when natural light provides partial illumination. This is particularly useful for canopy lighting and covered outdoor spaces.
Enterprise outdoor LED lighting systems — from manufacturers like Acuity Brands, Signify (formerly Philips), and Cree Lighting — can be connected to centralized management platforms that monitor energy use, schedule dimming profiles, detect fixture failures, and generate maintenance reports. For large campuses, municipalities, or industrial facilities managing hundreds or thousands of outdoor fixtures, this level of visibility can reduce maintenance costs by 25–40% annually.
Even a straightforward LED conversion can go wrong if you're not aware of the pitfalls. These are the issues that come up most frequently.
Most Type A conversions and many Type B conversions are within the reach of a competent DIYer who is comfortable working with household wiring. That said, there are situations where hiring a licensed electrician is the right call.
Electricians typically charge $50–120/hour depending on region. For a large commercial conversion, many electrical contractors offer per-fixture pricing for LED retrofits that can make professional installation cost-competitive when factoring in bulk purchasing power and speed.

Contact Us for More Details
Contact Information
Add:
No. 8 Qingcang Road, Qiangjiao Town, 315612 Ninghai, Ningbo, China
Phone:
+86-574-83530320
Fax:
+86-574-83530330
E-mail:
Join our community and stay connected
 English
 Français
 Español


